Enabling GCP SSO on the Cloud8 Panel #
SSO (Single Sign On) is a secure authentication method that allows users to log in without repeatedly entering their credentials. Cloud8 currently supports the following platforms:
- Azure AD
- AWS SSO
- Google Suite
- Github
- Centrify/CyberArk
- JumpCloud
- Okta
To enable GCP Single Sign On (SSO) on the Cloud8 Platform using Active Directory (AD), the user must send us the IdP Metadata and 3 URLs generated directly in the GCP interface.
Configuring SSO in GCP #
Add a SAML App #
- Sign in to the Google Admin Console using a super administrator account.
If you do not use a super administrator account, you will not be able to complete these steps. - Go to Menu > Apps > Web and mobile apps.
- Click Add app >> Add custom SAML app.
Enter the app name and, optionally, upload an app icon. The app icon appears in the list of web and mobile apps, on the app settings page, and in App quick access. If you do not upload an icon, one is created using the first two letters of the app name. - Click Continue.
- On the Google Identity Provider Details page, access the configuration information required by the service provider using one of these options:
- Download the IdP Metadata.
- Copy the SSO URL and Entity ID and download the certificate (or the SHA-256 fingerprint if necessary).
- (Optional) To enter the information on the SSO configuration page, open a separate browser tab or window, sign in to your service provider, enter the information copied in Step 5, and return to the Admin Console.
- Click Continue.
- Contact your service provider to obtain these field values. In the Service Provider Details window, enter the following:
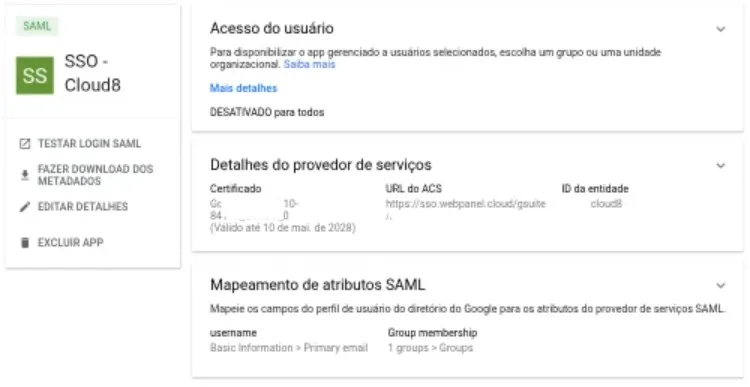
- ACS URL: The consumer assertion service URL of the service provider that receives the SAML response. Cloud8 suggests using https://sso.webpanel.cloud/gsuite/xxxxxxx (customer name).
- Entity ID: The globally unique name.
- Start URL: (optional) Sets the RelayState parameter in a SAML request, which can be a URL for redirection after authentication.
- (Optional) To indicate that your service provider requires the entire SAML authentication response to be signed, check the Signed response box. If this option is unchecked (default), only the assertion in the response is signed.
- (Optional) Set the Name ID format and Name ID value for the custom SAML app. The default Name ID is the primary email address.
Tip: Read the configuration articles in our SAML app catalog to view the required Name ID mappings for apps in the catalog. You can also create custom attributes in the Admin Console or Google Admin SDK APIs and map to those attributes. - Click Continue.
- If necessary, click Add mapping to map user attributes based on your service provider’s requirements.
- Note: You can define a maximum of 1,500 attributes for all apps. Since each app has a default attribute, it will count toward the total along with any other custom attributes you add.
- Under Google Directory Attributes, click the Select field menu and choose a field name. Not all Google directory attributes are available in the drop-down list. If an attribute you want to map (e.g., manager email) is not available, you can add that attribute as a custom attribute. Once added, it will become available for selection.
- Under App Attributes, enter the corresponding attribute of the custom SAML app.
- Note: You can define a maximum of 1,500 attributes for all apps. Since each app has a default attribute, it will count toward the total along with any other custom attributes you add.
- (Optional) To enter group names relevant to this app:
- Under Group membership (optional), click Search for a group, enter one or more letters of the group name, and select the name.
- Add other groups as needed (maximum of 75 groups).
- Under App attribute, enter the corresponding service provider group attribute name.
- Regardless of the total number of group names provided, the SAML response only includes groups that the user is a member of (directly or indirectly). For more information, see About group membership mapping.
- Click Finish.
Source:
Enable the SAML App #
- Sign in to the Google Admin Console using a super administrator account.
- If you do not use a super administrator account, you will not be able to complete these steps.
- Go to Menu > Apps > Web and mobile apps.
- Select the SAML app.
- Click User access.
- If you want to turn a service on or off for everyone in the organization, click ON for everyone or OFF for everyone, and then click Save.
- (Optional) To turn a service on or off for an organizational unit:
- Select the organizational unit on the left.
- To change the service status, select ON or OFF.
- Choose an option:
- If the service status is set to Inherited and you want to keep the current setting even if the parent setting changes, click Override.
- If the service status is set to Overridden, click Inherit to revert and use the parent setting, or click Save to keep the new setting even if the parent setting changes.
Learn more about organizational structure.
- (Optional) If you want to turn on a service for some users in one or more organizational units, select an access group. Learn more at Customize service access using access groups.
- Make sure that the email addresses users use to log in to the SAML app match the ones they use to log in to the Google domain.
Changes can take up to 24 hours, but typically happen faster.
Test App Functionality #
You can test both Identity Provider (IdP) and Service Provider (SP) initiated SSO.
IdP-initiated #
- Sign in to the Google Admin Console using a super administrator account.
If you do not use a super administrator account, you will not be able to complete these steps. - Go to Menu > Apps > Web and mobile apps.
- Select the custom SAML app.
- In the top left corner, click Test SAML login.
The app will open in a separate tab. If it doesn’t, use the information in SAML app error messages to update your IdP and SP settings as needed, and test SAML login again.
SP-initiated #
- Open the SSO URL of the new SAML app. The Google login page will open.
- Enter your username and password.
After your login credentials are authenticated, you will be redirected back to the new SAML app.
Finalizing SSO Configuration in GCP #
After configuring SSO, send an email to suporte@cloud8.com.br with the subject “Enable GCP SSO” and provide the following information:
- IdP Metadata file
- ACS URL, Entity ID, and Certificate
Creating the First User in Cloud8 #
Before logging in for the first time, it is important to create a user within the Cloud8 platform. You will need to set an initial password, but it will be removed once SSO is completed.
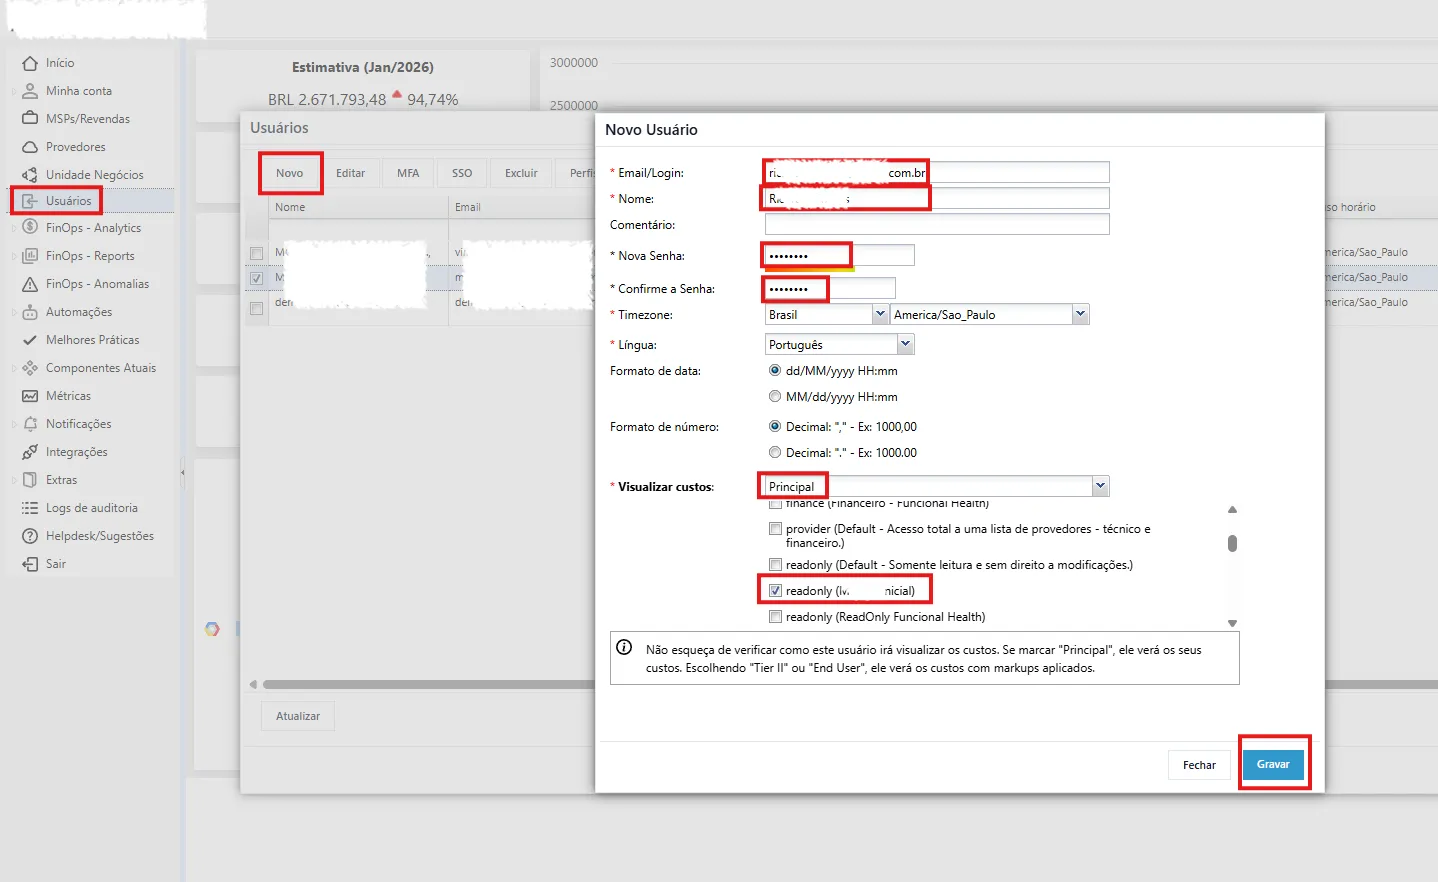
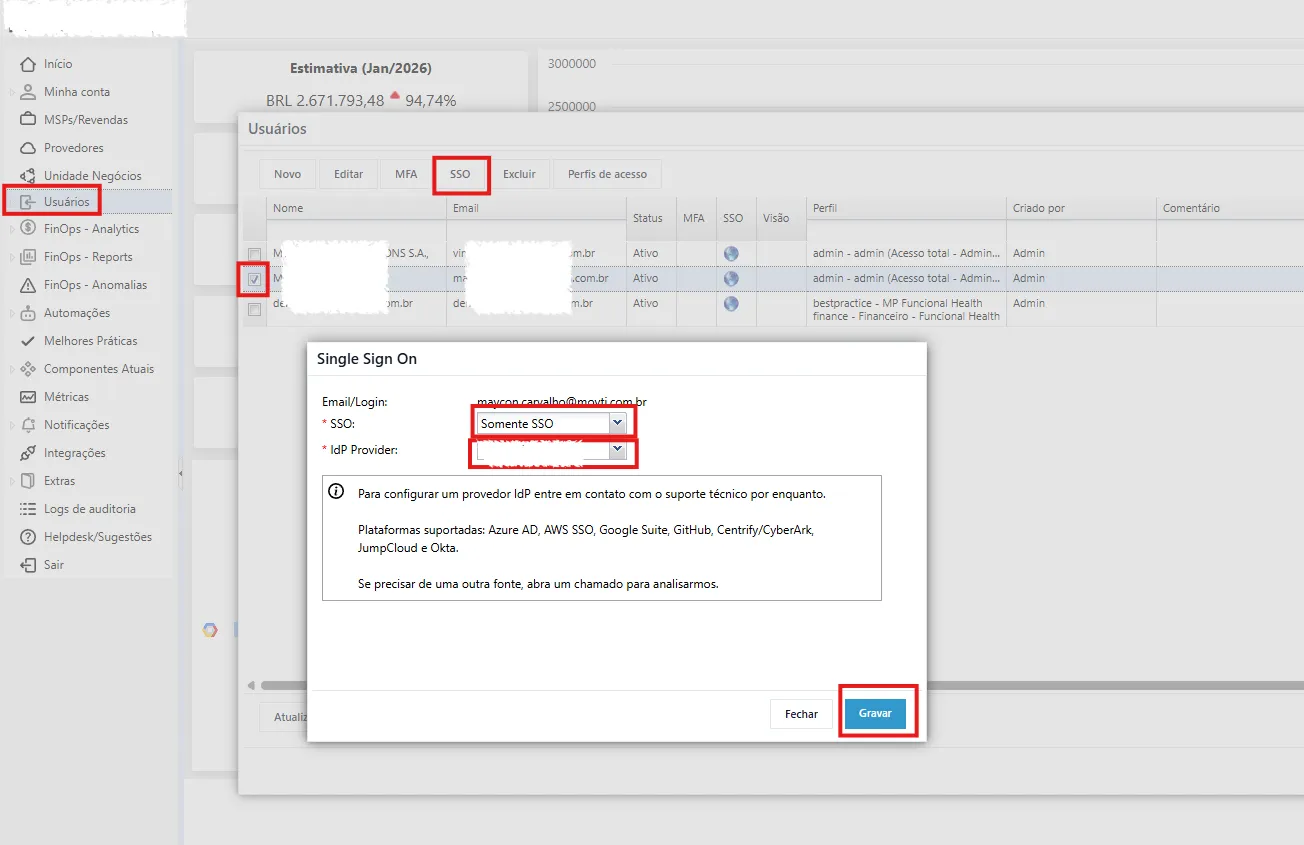
After creating the user, you will need to edit it to enable “SSO Only“.